Building a Drone With Arduino (p1)
There’s a few things I’ve always wanted to do but never had the time to. One of them is to play with an Arduino. The Arduino is a piece of hardware designed by a team in Italy (the blue board in the picture below).

Arduino #
This little board is truly disruptive because it breaks down several barriers that existed in the hardware world. I’ll illustrate this with an example: in order to develop a hardware product (a drone, a smart thermostat, a phone…) one could buy an ARM processor on a board and program it except…
- That board costs a lot of money
- The documentation is very complex and meant for professionals working in big firms that integrate this into consumer products
- It requires proprietary software and cables in order to load applications into the board
Arduino solves all these issues. First the Arduino UNO costs just $25 from the official store, or much less if bought from a 3rd party manufacturer. It comes with a simple documentation meant for people who have never developed hardware nor software in their lives. That’s the really tricky part, developing a hardware product requires both electronics and software engineering skills. Finally the really important part is that the Arduino is completely open, not just in terms of software but also hardware. This means anyone can build an Arduino-compatible device that can be programmed just like an Arduino, or that can work with an Arduino.
Drones #
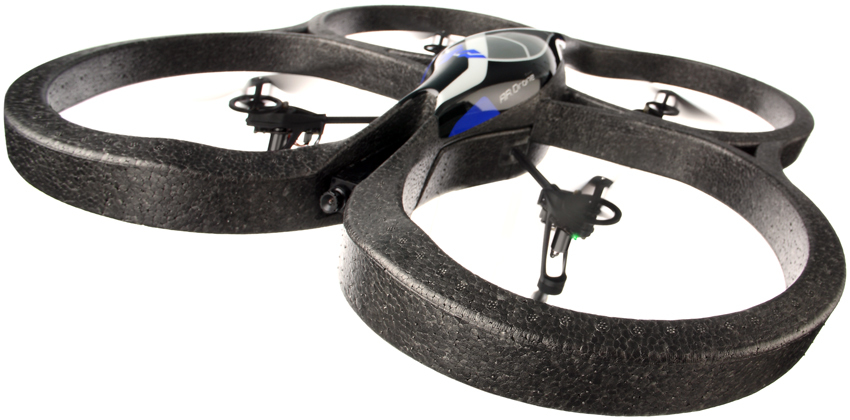
Thanks to the dropping prices of electronics and the development of open platforms such as Arduino, some very complex devices are becoming cheaper to design. Quadcopter drones are one of the many products that have been enabled by the hardware revolution. This really started when French company Parrot released the AR Drone in 2010. This was one of the first drones that was branded as a toy and had an affordable price.
The drone world is booming and fluctuating. Right now people are really interested in buying drones as toys. It’s true there has been talks and reports of companies wanting to use them for commercial purposes but none has made a big move yet. We all know the military has already been using drones for military purposes since a while but that’s a whole other category of drones. The population that want the toy drone are interested in drones they can fly themselves, drones that can go fast and lift DSLR cameras. I’m not interested in that at all.
Personally I’m interested in the automation side of designing a drone. I think drones are cool not because they can flown around by people while broadcasting a video feed but because drones are basically autonomous robots that can fly. A quadcopter is not all that simple to fly, and that’s why I really think it shouldn’t be flown at all –at least not by humans–. What I want really is to design a drone that can take very high level instructions and perform a mission. That mission could take weeks, require gathering data, recharging batteries and managing power, ensuring safety by avoiding no-fly zones and crowded areas, and finally returning safely with data and pictures.
The Project #
Goals & Requirements #
Here’s the set of goals for this project:
- The drone must be using an Arduino board at its core
- The drone must be able to fly (theoretically) any distance and come back safely
- The drone should only take high level instructions and act on its own
- Bonus goal: I can see a lighthouse on a tiny group of rocks on the horizon, I want the drone to go there and take a picture (and come back)

This basically means I’m going to need a drone with:
- A SIM card to communicate via GPRS
- An API and a server to which the drone can upload data and receive instructions
- Solar panels so that it can land and recharge its batteries on its own
- A GPS so that the drone can find its way to specific locations
- Various instruments for gathering data but also for stabilizing the drone and ensuring safety
Hardware Design #
Like I said earlier, many people who build drones nowadays are building toys and want them to be rugged and fast. Building my drone is going to be slightly different. I’m really going to focus on researching and comparing parts for their weights, power consumption and price. This obviously goes beyond hardware, I expect to spend most of the time on the software side figuring out no-fly zones, safe landing spots and so on.
The first step is to design and build something that is capable of taking off and landing safely. I need a processor, a gyroscope/accelerometer, some sort of power supply, four brushless motors with electronic speed controllers (ESC’s) and propellers, some kind of chassis for the whole thing.
Arduino #
I will be using the Arduino UNO, it comes with the starter kit or can be bought separately for $25 from the official website ($15 on Amazon).
Gyroscope #
The gyroscope I have selected is the MPU-6050 chip on a GY-521 board (Arduino page, complete spec). It is available online anywhere between $3 to $6.

Gyroscope / Accelerometer #
Chip: MPU-6050
Board: GY-521
Price: $3-$6
Voltage range: 2.375V-3.46V
Normal operating current: 3.9mA
Max power consumption: 13.494mWh
Arduino page and code
Official spec sheet
Motors #
I didn’t really know which motors my quadcopter would need. How much torque versus speed would I want? I opted to go for cheap motors from Neewer that came as a package bundling the motor, the ESC and a propeller locking nut.

Here’s a little comparison chart of a few brushless motors I found on HobbyKing:
| Name | MT2213-935KV MultiStar | NTM Prop Drive 28-30S | DYS BE1806-13 | Turnigy Multistar 3508-640Kv |
|---|---|---|---|---|
| Speed rating | 935kV | 800kV | 2300kV | 640kV | Weight | 55g | 65g | 24g | 98g |
| Max efficiency | unavailable | unavailable | 62% | unavailable |
| Max power | 200W @ 15A | 300W @ 20A | 89W @ 8A | 550W @ 30A |
| Max speed (calculated) | 12,467 rpm | 12,000 rpm | 25,588 rpm | 11,733 rpm |
| RPM per Watt (calculated) | 62 rpm/W | 40 rpm/W | 288 rpm/W | 21 rpm/W |
| Price | $15 | $16 | $10 | $30 |
Unlike a regular DC motor, a brushless motor is a little complex to start and control. This is why I need an electronic speed controller (ESC), which does that for me. This allows me to easily control the motor’s speed from the Arduino.
I learned that brushless motors have a speed rating measured in kV. This number is basically the motor’s theoretical RPM per input volt, assuming there’s no load (assuming it is not lifting any weight, since lifting weight adds friction therefore reducing the RPM). My motors are rated at 1,000kV, meaning 12V would make them rotate at 12,000rpm. A motor with a low kV rating will provide more torque and one with a higher kV rating will provide more speed. This motor has an 80% maximum efficiency. This is pretty terrible, it means 20% of the power is lost in excess heat. However this will still be good enough to get started. The HotSlots website was helpful understanding the specs of brushless motors.
Brushless motor #
Brand: Neewer
Model: A2212/13T
Speed rating: 1000kV
Price: $18 (Motor+ESC+prop nut combo)
Max motor current: 13.8A
Max ESC current: 30A
Max motor power: 150W
Max motor efficiency: 80%
Total weight with propeller: 100g (3.53oz)
Understanding brushless motor ratings
How to choose Motor and Propeller for Quadcopter and Multicopter
Chassis #
The fundamental part of the drone is the chassis, which holds everything together. I was considering purchasing a pre-built chassis online, which I’d modify for my own drone. Sadly though, most websites do not provide weight information, as if it were not really important. Out of the drone frames that have the information, it seems that the cheaper ones are really heavy. On average I’ve seen ~$30 frames weighing 400-600g while frames $100 or beyond could be 200-300g. The frames I see online usually are made out of aluminum or carbon fiber. Here’s a little comparison of what I found online:
| Name | Neewer HJ MWC X-Mode | Neewer X525 | Hobbypower X450 | HoverThings Flip FPV |
|---|---|---|---|---|
| Price | $17 | $21 | $39 | $147 |
| Weight | 408g (14.4oz) | 544g (1.2lb) | 200g (7oz) | 350g (12.35oz) |
| Material | Plastic | Fiber glass | Carbon fiber | Plastic |
This is really not an exhaustive list and is not necessarily representative of everything that’s available.
I thought about it for a while and decided I’d build my own frame. I came across a plastic material used for roofing, which is basically some kind of corrugated plastic sheet. It is incredibly light and strong enough. I did some measurements, cut it into pieces and glued together my very first drone frame.

The frame pictured above weighs 90g (3.17oz) and cost less than $10 in materials, all from Home Depot. Unfortunately this was my first design and it had a few flaws… there was no space to place the Arduino without the propellers hitting it. Additionally, it is a little tricky to securely fasten the motors to this frame.
I took a trip to Home Depot again and looked at the materials available. I ended buying a couple pieces of aluminum and came up with a new design (strongly inspired by stuff I had seen online).

This new frame weighs quite a bit more, it is 240g (8.47oz) and cost about $12 in materials. The big difference here is that the assembly is much more sturdy (though it is not proven it is necessary at all) and motors can be tightly screwed into the frame. I admit the design is simplistic, the frame doesn’t even have legs yet, though I don’t expect the weight of the frame to increase much.
Now I need to test this and make some measurements, stay tuned!