Get Started with LaTeX
LaTeX #
LaTeX, originally TeX is the name of a markup language as well as the piece of software that renders it. It was created by Don Knuth and later extended by Leslie Lamport. You can read more about LaTeX on Wikipedia and the LaTeX project website, but essentially it’s an application that allows you to produce documents.
Why LaTeX #
Not WYSIWYG #
Unlike Microsoft Word, LaTeX is not WYSIWYG (it’s not “what you see is what you get”). This means you’ll write text, press a button and then the application will turn that text into your final document and look amazing. There’s a huge and not-so-obvious advantage to this. When you write text in Word or Pages, you will spend a lot of time tweaking spaces, font sizes, line heights and such in order to obtain the visuals you want. What you want is things to line up properly, spacing to be even and pages and paragraphs to break at the right spot so that it looks good. It gets a lot more tricky when pictures, tables, graphs and equations are involved. Because LaTeX is not WYSIWYG, the entire process of fixing up the visual elements of your document goes away and you can focus your time on content. All the visuals are calculated and created for you based on your text, but also based on the code you write. LaTeX does require some coding but as we’ll see shortly it is extremely simple.
Equations #
LaTeX was originally created to write scientific papers. Therefore it is really important that it supports the display of complex equations. LaTeX will turn any one-line text equation into something beautiful that’s perfectly spaced and aligned, check this page for examples.
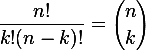
Table of contents #
LaTeX will generate your table of contents automatically based on the titles and subtitles you have used throughout your document, without any need for tweaking. The only thing you need to do is tell LaTeX if and where you want that table to appear.
More #
There’s a lot more reasons for using LaTeX, some reasons are a lot more important to scientists, some are important to software engineers so I won’t go into details but essentially: version control, no compatibility problems, lots of packages available to import to format your document…
Guide #
This is a very simple guide for the absolute beginner. There are a lot of ways to transform LaTeX into a document and the original program to do it is a command-line program. However, to make it simpler you can use a visual application such as TexShop for Mac or LyX.
Start #
Open up your editor (TexShop, LyX or other) and start off by telling LaTeX what kind of document you want to write. This will help for formatting, write down:
\documentclass[letterpaper, 12pt]{article}
Here’s an explanation of what this does:
- letterpaper is the type of paper you will be printing this on. You could also write a4paper.
- 12pt is the font size you want to use by default.
- article is the type of document you’re writing. This could also be: book, report, letter… You can check this webpage for all the possible parameters you can define for your document.
For the advanced users there’s a lot of things and behaviors that can be defined before the document itself starts but we won’t get into that now, so just copy this line to tell LaTeX we’re ready to start writing!
\documentclass[letterpaper, 12pt]{article}
\begin{document}
Hello World
\end{document}
Your actual text is going to go between these two lines, in the example above we just have Hello World. This is it! you’re ready to compile your document, if you’re using TexShop you can click Typeset. As your document compiles, a lot of files will be generated, don’t worry about those however I don’t advise deleting them. Your PDF file is then produced and you can send it to anyone you like (without the other files).
Sections #
Let’s create a new section for your document:
\documentclass[letterpaper, 12pt]{article}
\begin{document}
\section{Introduction}
Hello World
\section{Conclusion}
\end{document}

Try this out and you’ll see that LaTeX will automatically create the sections, size the font correctly, use the right amount of boldness, align things the way they should be aligned and even number the sections. Don’t want numbering? easy:
\documentclass[letterpaper, 12pt]{article}
\begin{document}
\section*{Introduction}
Hello World
\section*{Conclusion}
My conclusion.
\end{document}
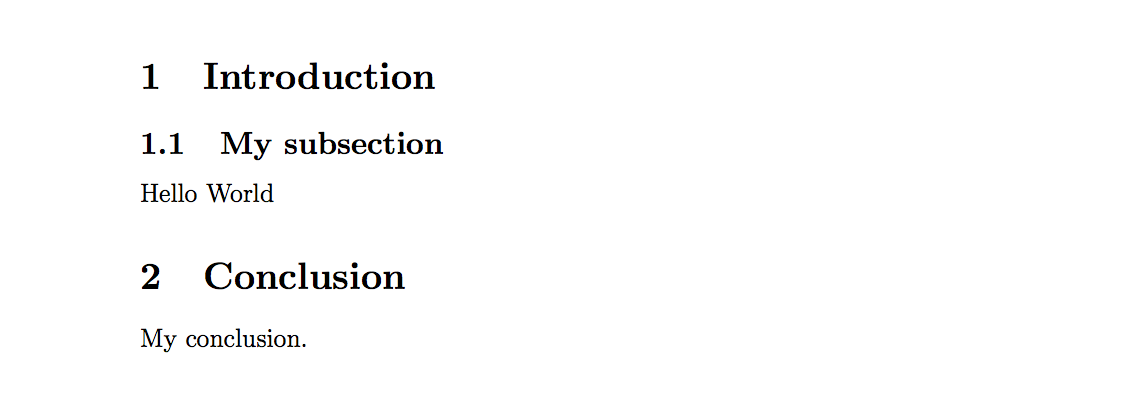
Do you have a sub section? try this out:
\documentclass[letterpaper, 12pt]{article}
\begin{document}
\section{Introduction}
\subsection{My subsection}
Hello World
\section{Conclusion}
My conclusion.
\end{document}
Paragraphs #
In LaTeX, paragraphs are created for you. All you need to do is to press the Return key twice to skip two lines and LaTeX will understand you want a new paragraph:
This is my first paragraph.

This is my second paragraph.
Sometimes you may want to break the line, another way of doing it is using two backslashes \\ at the end of your line, however LaTeX won’t accept it unless you actually have text coming afterwards:
This is my first paragraph.\\
This is my second paragraph.
New Pages #
Maybe you want your new section to always start on a new page, no matter what. In Word or Pages you’ll have to “insert a page break”. This page break you insert is like an invisible character. You may put a space before and after, you may delete it inadvertently, and quickly put it’s a clumsy way of skipping a page. In LaTeX, you just need to write \newpage and the rest will be taken care of for you:
\documentclass[letterpaper, 12pt]{article}
\begin{document}
\section{Introduction}
\subsection{My subsection}
Hello World
\newpage
\section{Conclusion}
My conclusion.
\end{document}
Formatting #
Here’s a few simple ways to format your text:
\textbf{my text}for bold text.\emph{my text}for italics.\underline{my text}for underlining
Now what if I want to both underline and make my text bold?
\underline{\textbf{my text}} is how you do it. You have to remember that LaTeX was designed for writing serious papers. This means that it wasn’t designed to provide you with glitter-style formatting. By that I mean it is normal that formatting text is not the simplest and things like changing fonts, adding colors and more are not things that are made available easily, simply because they’re not usually needed. However LaTeX is also about freedom, and therefore everything is possible. With a simple Google search you can find ways to have colored text in your LaTeX document, changing fonts and more.
Lists #
There are several ways to make lists of items in LaTeX and I’ll just go over the two most common: enumerating and itemizing. Basically one has numbers or letters and the other has bullet points:
\begin{enumerate}
\item This is the first item in my list!
\item Second item
\end{enumerate}

For bullet points simply use:
\begin{itemize}
\item First bullet
\item Second bullet
\end{itemize}

Tables #
LaTeX can be very powerful when it comes to displaying and customizing tables, so to keep it simple I’ll just go over simple tables that you might use often. When creating a table, you must decide first how you want your columns to be formatted. Here’s an example:
\begin{tabular}{l c r}
\end{tabular}
The above is an empty table and {l c r} defines the columns. I’ve got three columns and the first one has its text left-aligned, the middle one has its text centered and the third one… can you guess? l, c and r essentially tell LaTeX how to align text inside your columns. What if we want more columns? you could write something like this: \begin{tabular}{r r r r r r}.
In this line you also decide which columns should be separated by a vertical line, since by default your table will have absolutely no lines. If you want a line between every column, you would write {l | c | r}. The symbol I’ve added is the pipe symbol |, not to be confused with the lowercase letter l. If you want your table to also have lines surrounding it then {| l | c | r |}. LaTeX lets you create double lines too {| l || c || r |}.
Let’s get started with a very simple table that has three columns and two lines:
\begin{tabular}{l | c | r}
A & B & C\\
1 & 2 & 3\\
\end{tabular}

Try this and see what happens. We use the ampersand & to tell LaTeX when we’re done with one cell of the table. We also use the double backslash \\ to show when the table row ends.
One last thing I didn’t explain is how to add horizontal lines:
\begin{tabular}{l | c | r}
\hline
A & B & C\\
\hline\hline
1 & 2 & 3\\
\hline
\end{tabular}

This should put a horizontal line on top, bottom and a double horizontal line in the middle. What if you want to actually use the ampersand in the text you’re writing in a cell? well the ampersand is a reserved symbol. Because LaTeX uses it as part of your code, you need to do something that software engineers call “escaping”. To get to the point, you’ll have to write \& to display an ampersand in your text. This also goes with some other characters such as the dollar sign \$.
More #
Don’t forget to use Google to find out more about LaTeX and how to go further and use more advanced features. You’ll find how to include images, graphs, change the page numbering etc. Here are a few very helpful resources: