Getting Started With Chrome Extensions

A long time ago, during an internship at Rakuten in Boston, I worked on a Firefox extension. It involved using an obscure markup language called XUL. There was very little documentation on it and it took me about a summer to build an MVP that could make requests to a NodeJS backend. That said, I wasn’t super keen on doing browser extension development again, however an opportunity arose.
At Yelp, all code repositories are stored in git on private servers. There is no UI so how do you do code reviews? Yelp engineers use an antiquated and open source piece of software called Review Board. Yelp is actually a contributor to the code base and maintains its own fork. Long story short… I didn’t like the Review Board UI and decided to fix it. However it was going to be a major pain for me to get access to Yelp’s fork of it and it wasn’t clear Yelp would let me deploy any changes. So I decided to hack it by building an extension for Chrome, which would ideally inject some CSS and a few sprinkles to make Review Board better!
As it turns out, making an extension for Chrome is incredibly easy and simple. Chrome extensions are completely HTML and JS based, which actually allows you to bring in any third party JS libraries you wish and that includes jQuery and React.
The Simplest Extension #
There are a few types of extensions you can build, in this post I’ll only talk about toolbar tools. A great resource is Google’s documentation because it reads easily, is comprehensive and searchable. Google also provides many sample projects you can download, and a Hello World example right here.
All you need is two files:
- An HTML file that lays out the UI for the toolbar tool.
- A
manifest.jsonfile that specifies your extension’s settings for Chrome in JSON format.
I admit I’m copy pasting from Google’s doc here (with typos fixed :]) but the simplest extension you can make is:
hello.html #
<html>
    <body>
        <h1>Hello Extension</h1>
    </body>
</html>
manifest.json #
{
    "name": "Hello Extension",
    "description" : "Base Level Extension",
    "version": "1.0",
    "manifest_version": 2
}
Then navigate to chrome://extensions, make sure you check off Developer mode in the top right and click Load unpacked extension.... From there it should be pretty straightforward ;)

Running Javascript #
There are a few ways to run Javascript in your extension. The simplest one is simply to add a Javascript include in your HTML page as follows:
<html>
    <head>
        <script src="my-script.js"></script>
    </head>
    <body>
        <h1>Hello Extension</h1>
    </body>
</html>
Use the same technique to add jQuery and more.
Styling My Extension With CSS #
Just like for Javascript, you can add that to the head of your HTML page. The example below shows how to add Bootstrap:
<html>
    <head>
        <link rel="stylesheet" href="https://maxcdn.bootstrapcdn.com/bootstrap/3.3.7/css/bootstrap.min.css" integrity="sha384-BVYiiSIFeK1dGmJRAkycuHAHRg32OmUcww7on3RYdg4Va+PmSTsz/K68vbdEjh4u" crossorigin="anonymous">
    </head>
    <body>
        <h1>Hello Extension</h1>
    </body>
</html>
YelpRBX #
In case you’re curious, the extension I built at Yelp (with the help of a couple other Yelpers) is called YelpRBX (stands for Review Board eXtension) and looks like this:

Note I’ve tweaked the screenshot above to hide information internal to Yelp…
It gives you quick access to your pull requests and any tickets you’ve been assigned to review. It shows you desktop notifications for any issues posted on your code and when your requests get approved. It also injects CSS into Review Board and re-organizes a couple toolbars using Javascript.
Without the extension, Review Board looks like this:
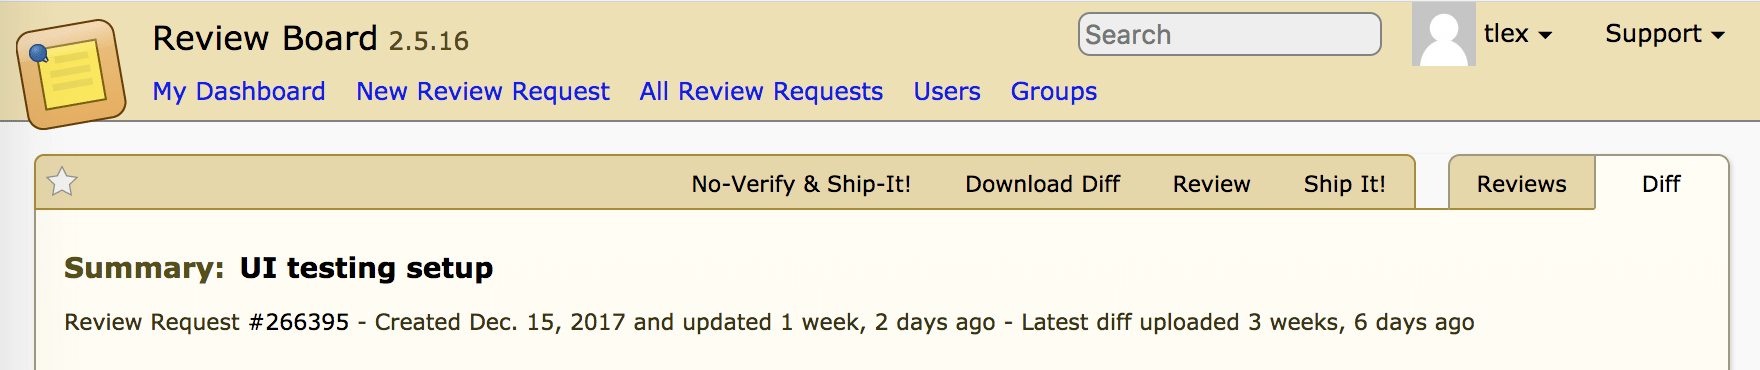
And with the extension:

Believe me or not, a couple people have complained to me they hate the new design. A bug in the extension prevented users from disabling the CSS injection…
The Difficult Stuff #
I’ve talked about what’s easy and Google does a great job at covering that too. However, I thought I’d talk about a few things that are difficult and save you time from searching.
Desktop Notifications #
I spent some time on this and it’s partly because Chrome has changed the API for notifications a couple times. The way it works in Chrome 60+ on macOS is that it uses native notifications, which actually has reduced the number of features available. You can read Google’s doc for notifications and you’ll notice stuff like this:

So while typically your Chrome extensions don’t really need to care about the OS they’re used on, when it comes to notifications you do have to care because not all features are supported on macOS.
Before you get started, ensure your extension has the right permissions by opening your manifest.json file and checking it has:
"permissions": ["notifications"],
Example #
var notificationParams = {
    'type': 'basic',
    'requireInteraction': false,
    'isClickable': true,
    'priority': 1,  // 2 is highest, 0 lowest
    'iconUrl': 'images/image.png',
    'title': 'Ship It!',
    'message': 'Say stuff here :)'
};

var notificationId = 'ship-it';

chrome.notifications.create(notificationId, notificationParams, function(notificationId) {
    if (!notificationId) {
        return;
    }

    //...
});
The above shows a desktop notification immediately. The notificationId is optional if Chrome version is at least 42. If you show a notification with a notificationId and such a notification is already showing, it will clear that notification. If you do not provide a notificationId then one will be generated for you. Either way, you may want to keep track of that notificationId because that’s how you can listen to user interactions on your notifications.
If you wish to add buttons to your notification, simply add something like this to the notificationParams:
'buttons': [{"title": "View Diff"}, {"title": "View Reviews"}]
And you may want to flip requireInteraction to true so that the notification doesn’t dismiss until the user actually clicks a button.
If you want to listen for user interactions on your notifications, you need to setup listeners before you show the notification. To listen to clicks on the notification bubble as a whole:
chrome.notifications.onClicked.addListener(function(notificationId, byUser) {
    // notificationId: this is why you need to keep track of the notificationId you use for showing notifications, so you know which notification is being interacted with here
    // byUser is a string, either of 'user' or 'system'. 'system' means it was dismissed by a timeout (or else, but essentially by Chrome or macOS)
});
To listen to clicks on your buttons:
chrome.notifications.onButtonClicked.addListener(function(notificationId, buttonIndex) {
    // buttonIndex is all you get so you need to know what that means, if that's 1 then with my example code it would be the 'View Reviews' button
});
Detecting Page Changes #
Chrome can tell your extension when a tab changes. This would be a page refresh or the user navigating to a new URL, or a redirect. Doing this is very simple, just use:
chrome.tabs.onUpdated.addListener(function(tabId, changeInfo, tab) {
    // tabId is a unique identifier for the tab
})
tabId is a string and it just serves as a unique identifier for the tab.
changeInfo allows you tell what’s going on with the tab, use changeInfo.status == 'complete' to tell if loading is complete.
tab is a Tab object and it has a bunch of properties, something you may need is tab.url which gives you the full URL being displayed.
You will also need to add some permissions in your manifest.json file:
"permissions": ["tabs", "activeTab"],
Injecting CSS Into Pages #
Chrome offers a couple ways of injecting CSS into web pages, my favorite is the one that uses a file. So you provide a .css file with your extension and with very little code you can inject that into one of the tabs of the browser:
var cssFile = {'file': 'my-custom-style.css'};
chrome.tabs.insertCSS(tabId, cssFile, function() {
    // it's done!
});
Now there’s a security concern with this and your extension needs to specify a new permission in its manifest.json file that indicates specific domains for which it can do injections:
"permissions": ["http://google.com/", "https://google.com/"],
The permissions above allow you to inject CSS, Javascript and HTML on Google pages. Additionally, if you’re planning on injecting whole files like I did in my example, you’ll need to add each file to the security policy to make them accessible to your extension. Add this to your manifest.json:
"web_accessible_resources": ["my-custom-style.css"]
Another way to inject CSS into pages is to use content scripts. See my explanation a bit below.
Injecting Javascript Into Pages #
Injecting Javascript is very similar to injecting CSS, see the paragraph above for permissions concerns. Example:
chrome.tabs.executeScript(tabId, {'file': 'my-script.js'});
Something tricky is that once your Javascript is injected into the page, you may not access that from your extension’s script. This means that you can’t call a function you just injected from your extension. This matters because say your extension does some async work and wants to pass the result from that to the script you injected into the page: you simply can’t. So something you can do is execute a hard-coded script instead on the page:
chrome.tabs.executeScript(tabId, {'code': 'alert("' + asyncResult + '")'});
This is an example that executes Javascript on a page with variable data.
Another way to inject Javascript into pages is to use content scripts. See my explanation below.
Content Scripts #
Chrome provides a way for you to execute Javascript/CSS in the context of the webpages. This essentially injects the Javascript and CSS except you do not control how or when it’s run. All you can do is tell Chrome which webpages should run the script. To achieve this, modify your manifest.json file to add this:
"content_scripts": [
    {
      "matches": ["https://google.com/*", "http://google.com/*"],
      "css": ["my-custom-style.css"],
      "js": ["libs/jquery-3.2.1.min.js", "my-script.js"]
    }
]
The above runs your CSS and Javascript on all Google pages. Note that for this to work, each file needs to be added to "web_accessible_resources" in the manifest.json file.
Doing Work In The Background #
When your toolbar item hides its menu, your whole extension goes to sleep. There are a couple ways to do work in the background when your extension is sleeping. My favorite is to specify in the manifest.json file the scripts you’d like to run. Example:
"background": {
    "scripts": ["libs/jquery-3.2.1.min.js", "my-script.js", "other-script.js"]
},
The above includes 3 scripts, which Chrome combines in the same scope. The above allows my background scripts to make use of jQuery. Read more here.
More #
There’s a lot more cool stuff you can do like create dialogs, store data etc. and Google’s documentation is a great resource for that.