HTML and CSS for Beginners
If you’re reading this, then you’re probably thinking of building your very first website though you probably already have a domain name and hosting. In this short guide I’ll only focus on the essentials for writing the code to build a couple web pages.
Get a Text Editor #
The first thing you need, is to choose a text editor. You will be writing HTML source code and therefore you need to choose an editor that’s appropriate, Microsoft Word isn’t going to work for this. There’s a million choices and software engineers can get defensive and are often religious about their favorite code editors.

For Windows #
For Mac #
Get Started #
Let’s dive in, write something and see what happens. Just write:
Hello World
Save this to a new file called index.html, then open that file in your web browser. That’s it, you have a web page! Now we want to make it fancier, maybe add more text, have colors, paragraphs etc. so we’ll need to use HTML code. This may sound scary but trust me it’s really simple.
The first step is to tell the web browser that we’re going to use HTML (we could be writing something else than HTML so we want to be sure the browser knows what we’re giving it). Replace your text with the following:
<html>
    <body>
        Hello World
    </body>
</html>
If you open this in your web browser you will probably see the exact same thing you did before. The big difference is that this is HTML and not plain text anymore. Something else that’s interesting is that <html> doesn’t show up in your web browser, how come? well this <html> thingy is called a ‘tag’. It tells the browser that starting from that point forward, we’re going to have HTML code, until we reach the closing tag </html>, get it? This is essentially our HTML document. There can be many parts in this document, and the most important is the body, and the <body> tag tells the browser where the document’s body goes.
Looking at my code, did you notice how <body> is a little spaced out from the left margin? Software developers do this so that the code looks organized (unlike their office desks). This separation can be a tab, or two to four spaces depending on your preference.
Let’s write some more text:
<html>
    <body>
        Hello World! This is my website
    </body>
</html>
Now let’s say I want to have ‘this is my website’ on the next line. You could try this:
<html>
    <body>
        Hello World!
        This is my website
    </body>
</html>
Open your browser and you will notice that it’s still all on the same line. This is because your web browser deletes all new lines and extra spaces. You could write all of this on the same line in your code and it would make no difference:
<html><body>Hello World! This is my website</body></html>
The only way you can add a new line is with HTML code. You can do it using the <br/> tag (‘br’ stands for ‘break’). This tag is special in the sense that it doesn’t need a closing </ part, it just stands alone:
<html>
    <body>
        Hello World!<br/>
        This is my website
    </body>
</html>
Note that the above works exactly the same as the following:
<html>
    <body>
        Hello World!<br/>This is my website
    </body>
</html>
HTML Tags #
Now you know about a couple HTML tags, namely: <html>, <body> and <br/>. Well guess what, there are tons more and they all do various things.
Headers #
We’ll start by adding a header to your web page. There are 6 tags for that: <h1> to <h6>. Try the following code:
<html>
    <body>
        <h1>Hello World!</h1>
        This is my website
    </body>
</html>
Automatically ‘Hello World!’ will be displayed much bigger and in bold. Something special about headers is that you don’t need a line break, so I removed the <br/>. You can try all the different headers provided to you:
<html>
     <body>
        <h1>Hello World!</h1>
        <h2>Hello World!</h2>
        <h3>Hello World!</h3>
        <h4>Hello World!</h4>
        <h5>Hello World!</h5>
        <h6>Hello World!</h6>
    </body>
</html>

Lists #
HTML provides you with two basic types of lists: ordered and unordered lists. You can define these with the tags <ol> and <ul> respectively. Each item in the list has to be encapsulated with a <li> list-item tag. No other text or HTML tags can go in a list.
<html>
     <body>
        <h1>My recipe</h1>
        <h2>Ingredients</h2>
        <ul>
            <li>Sugar</li>
            <li>Flour</li>
        </ul>
        <h2>Method</h2>
        <ol>
            <li>Mix everything</li>
            <li>Eat everything</li>
        </ol>
    </body>
</html>

Links #
Now you may want to have links in your pages. Links are pieces of text or buttons that when clicked will take the visitor to another page. You need links for people to navigate through pages on your site, or you may be linking to a page on someone else’s website. You can create links using the <a> tag. Example:
<a>My link</a>
This won’t work on its own, you will need to explain where this is supposed to link to. So we’ll add some parameters to this link, as follows:
<a href="http://google.com">Go to Google</a>
Now let’s use this in context. Take your index.html file, make a copy of it and call it recipe.html. You should now have to files that contain the same code. Open index.html with your text editor and write the following:
<html>
     <body>
        <h1>My recipe book</h1>
        <ol>
            <li>My recipe 1</li>
            <li>My recipe 2</li>
            <li>My recipe 3</li>
        </ol>
    </body>
</html>
Ideally we would want a visitor to click on ‘My recipe 1’ and the browser would take them to your recipe page. You can achieve this using a link:
<html>
    <body>
        <h1>My recipe book</h1>
        <ol>
            <li><a href="recipe.html">My recipe 1</a></li>
            <li>My recipe 2</li>
            <li>My recipe 3</li>
        </ol>
    </body>
</html>
You could also link to a page that’s anywhere on the web, for example I can add a link to Wikipedia:
<html>
    <body>
        <h1>My recipe book</h1>
        <ol>
            <li><a href="recipe.html">My recipe 1</a></li>
            <li><a href="http://en.wikipedia.org/wiki/Julia_Child">Julia Child</a></li>
            <li>My recipe 3</li>
        </ol>
    </body>
</html>
Images #
I think the most important tag we haven’t gotten to yet would be image tags. Just like the line break tag, it stands alone: <img/>. This tag alone isn’t enough and just like link tags, it will need some parameters to specify which image you want to display. Pick an image file and place it in the same folder as your index.html file. I’m going to pretend this image is image.jpg, but it’s up to you to replace that with the correct name in your code. Here’s an example:
<img src="image.jpg" />
Do not forget the extension. In my example above I have a jpg image. Your computer may hide the extension from you and therefore won’t display it in the file name. Make sure you know what type of image it is otherwise this won’t work. Something cool is that you don’t need to have the file there. You are also allowed to link to an image that’s somewhere on the web:
<img src="https://jackfru.it/images/Jack-Fruit-2.png" />
Now maybe I want this picture to be a certain size. You may specify the dimensions as follows:
<img src="https://jackfru.it/images/Jack-Fruit-2.png" height="100" width="50" />
You don’t need to specify both the width and height, if one is missing then the browser will automatically adjust the size of the picture. I wrote 100 and 50, those numbers represent pixels. I know this may not be too intuitive for less technical folks but it’s a common unit for measuring dimensions.
Open recipe.html and let’s add a picture for this recipe:
<html>
    <body>
        <h1>My recipe</h1>
        <img src="https://jackfru.it/images/Jack-Fruit-2.png" height="100" />
        <h2>Ingredients</h2>
        <ul>
            <li>Sugar</li>
            <li>Flour</li>
        </ul>
        <h2>Method</h2>
        <ol>
            <li>Mix everything</li>
            <li>Eat everything</li>
        </ol>
    </body>
</html>

Styles #
This is a good start but this could look so much better. We want colors, fonts and more to make the web page look attractive and personal. HTML is used to tell the browser where things go and what they are (is it a header? is it a link or an image? does it come before this or after?). I’ll now introduce CSS, which tells the browser how things look.
Head Tag #
Go back to your index.html file and modify it as follows:
<html>
    <head>

    </head>
    <body>
        <h1>My recipe book</h1>
        <ol>
            <li><a href="recipe.html">My recipe 1</a></li>
            <li><a href="http://en.wikipedia.org/wiki/Julia_Child">Julia Child</a></li>
            <li>My recipe 3</li>
        </ol>
    </body>
</html>
Notice I added the <head> tag up there? this is an element of your HTML document that’s not part of the body and therefore will not show up in the browser. The header is used for a lot of things and essentially it is for those things we don’t want to be displayed. Try the following:
<html>
    <head>
        <title>Recipes</title>
    </head>
    <body>
        <h1>My recipe book</h1>
        <ol>
            <li><a href="recipe.html">My recipe 1</a></li>
            <li><a href="http://en.wikipedia.org/wiki/Julia_Child">Julia Child</a></li>
            <li>My recipe 3</li>
        </ol>
    </body>
</html>
I’ve added the <title> tag, which lets you define the title of your page. This title will now be visible in your browser tab. Previously that may have looked like “Untitled”, it should now say “Recipes”.
CSS #
You might have guessed it, CSS goes into the <head> tag. Software engineers will cringe reading this and I’ll explain why shortly. Add the following to your header, it doesn’t matter if it comes before or after the title:
<style>
    body{
        font-family: Arial;
        color: blue;
    }
</style>
Everything that goes between the <style> tags is CSS code. CSS is a different language and has nothing to do with HTML. However it’s okay to have it there because the tag tells the browser it’s now dealing with CSS. Try this in your browser and you should get something like this:

Before we go any further with CSS, we’ll do the right thing. It may sound surprising but software engineers like their source code to be well organized. The reason for that is that it should be easy to find something even when you have millions of lines of code and millions of pages. Typically, it is good practice to move the CSS to a separate file, and the reason for that is not just organization but also reutilization.
Create a new folder and name it “css”. All your CSS files should go in there. Using your text editor, create a new file in that folder and call it “main.css”. Now copy your CSS code into that file and get rid of that <style> tag entirely.
So how can this work? simply put this into your header:
<link rel="stylesheet" type="text/css" href="css/main.css" />
As you can see, you can specify the path to your CSS file in the href parameter and include the folder name. Your code should now look like this:
<html>
    <head>
        <title>Recipes</title>
        <link rel="stylesheet" type="text/css" href="css/main.css" />
    </head>
    <body>
        <h1>My recipe book</h1>
        <ol>
            <li><a href="recipe.html">My recipe 1</a></li>
            <li><a href="http://en.wikipedia.org/wiki/Julia_Child">Julia Child</a></li>
            <li>My recipe 3</li>
        </ol>
    </body>
</html>
So what happens if you want to have this style applied to all of your pages? it’s simple, just add the same <link> tag to all your pages. The magic here is that you can make a style change in main.css just once and see the results on all your pages without having to modify any page (this is what I meant by reutilization earlier).
Make sure you modify recipe.html so that it also has a <head> tag and links to your CSS file. The code should look like this:
<html>
<head>
<title>Recipes</title>
<link rel="stylesheet" type="text/css" href="css/main.css" />
</head>
<body>
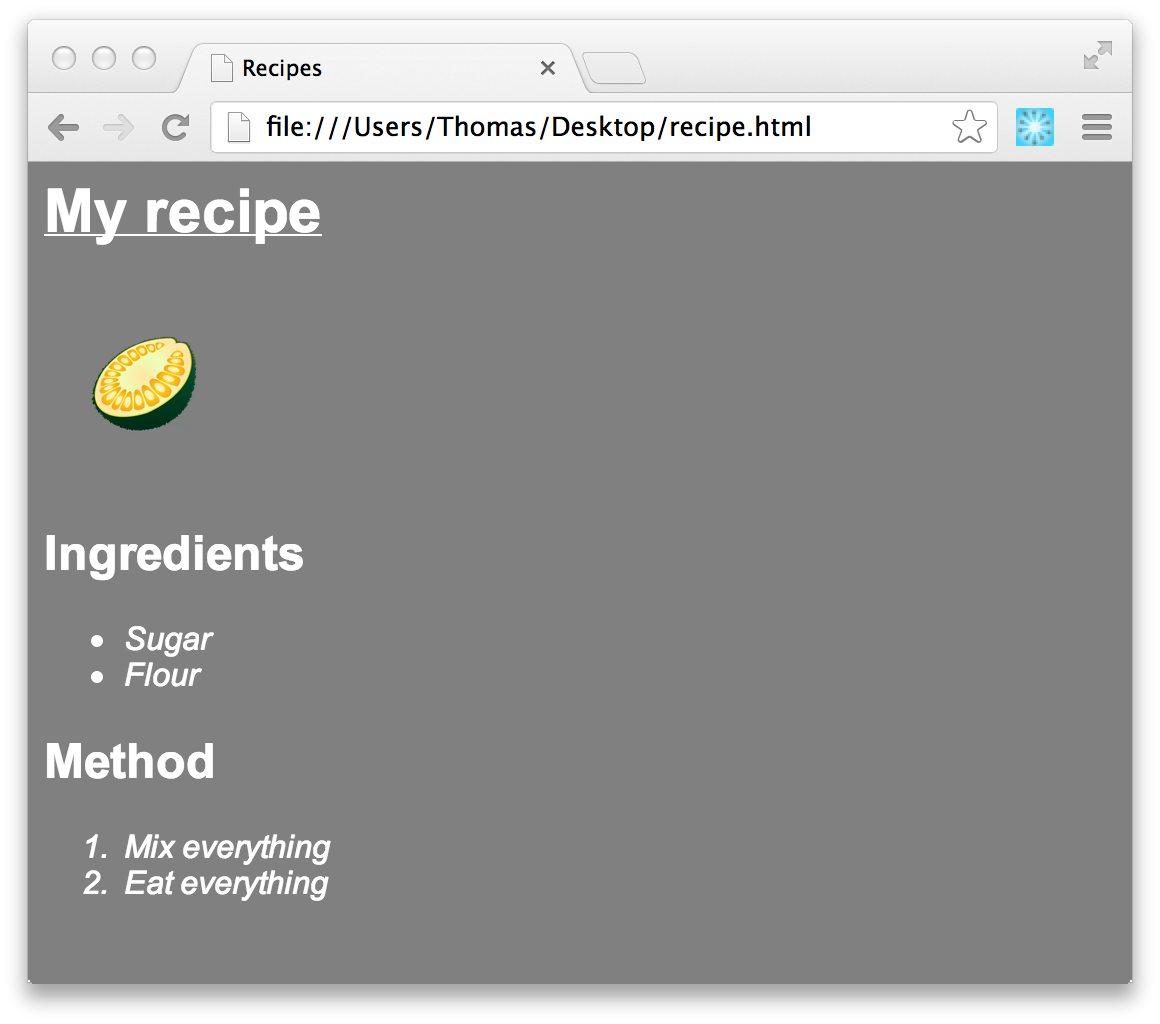
<h1>My recipe</h1>
<img src="https://jackfru.it/images/Jack-Fruit-2.png" height="100" />
<h2>Ingredients</h2>
<ul>
<li>Sugar</li>
<li>Flour</li>
</ul>
<h2>Method</h2>
<ol>
<li>Mix everything</li>
<li>Eat everything</li>
</ol>
</body>
</html>
Digging Into CSS #
You can now close the text editor for recipe.html and index.html, we won’t be touching those for a while, but open main.css. CSS is nifty, the way it works is that you specify what HTML tag you want to style and then write down the styles. Right now you should have:
body{
    font-family: Arial;
    color: blue;
}
Let’s make some changes so that we specify a style for your headers and list items:
body{
    background: gray;
    font-family: Arial;
    color: white;
}

h1{
    font-size: 30px;
    text-decoration: underline;
    font-weight: bold;
}

h2{
    font-size: 24px;
    font-weight: bold;
}

li{
    font-style: italic;
}
Your recipe.html page should now look like this:
Now let’s say I wanted to have my list items look different when they’re ingredients for my recipe. So list items that are part of an un-ordered list should have a special style. There’s a way to do this:
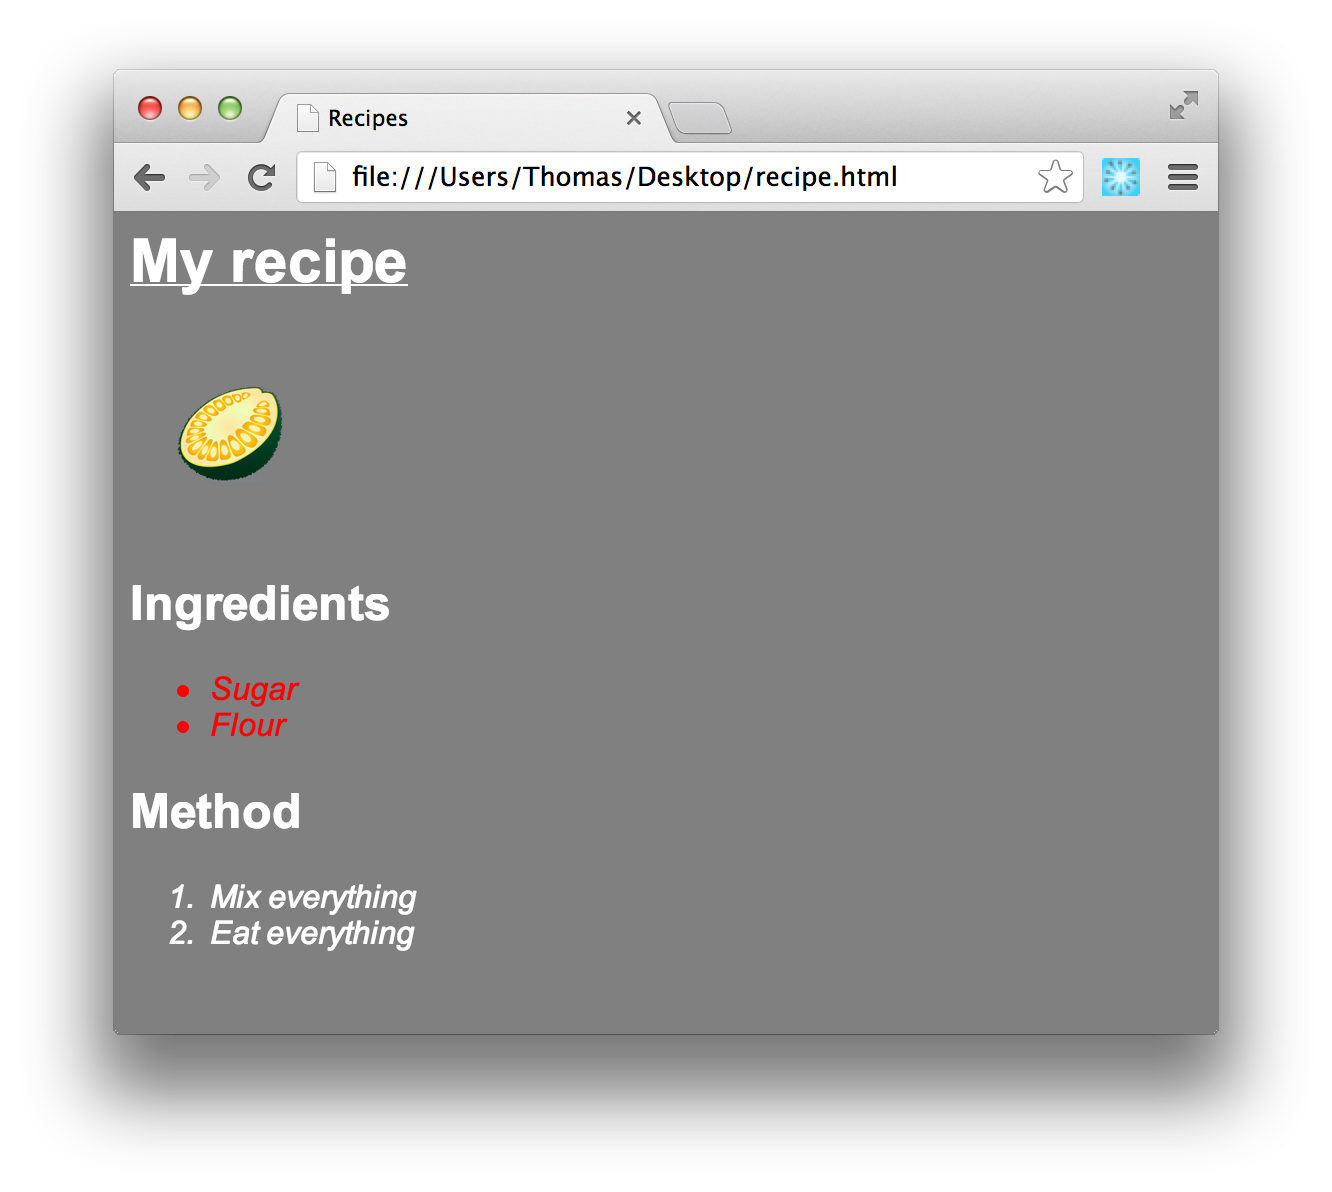
ul li{
    color: red;
}
This means all <li> tags that are under <ul> tags will have the above style. Add this at the end of main.css and look at your page in the browser and it should look like this:
Classes #
Now something is bothering me. I’ve changed my mind and I want the method list of my recipe to be un-ordered as well. So open recipe.html and change it to:
<html>
    <head>
        <title>Recipes</title>
        <link rel="stylesheet" type="text/css" href="css/main.css" />
    </head>
    <body>
        <h1>My recipe</h1>
        <img src="https://jackfru.it/images/Jack-Fruit-2.png" height="100" />
        <h2>Ingredients</h2>
        <ul>
            <li>Sugar</li>
            <li>Flour</li>
        </ul>
        <h2>Method</h2>
        <ul>
            <li>Mix everything</li>
            <li>Eat everything</li>
        </ul>
    </body>
</html>
However there’s a problem, now my method is all in red. Well don’t despair, there’s a way to make the method white and the ingredients red, using classes. Classes are a way to tell a program that there are different types of something. We’re going to have an un-ordered list that’s for ingredients, and un-ordered lists for everything else. So change the opening <ul> tag in recipe.html for your ingredients list to <ul class="ingredients">.
Go back to main.css and modify what we’ve just added to:
ul.ingredients li{
    color: red;
}
This will tell the browser that only list item tags that are under a <ul> tag of class “ingredients” should be styled this way. Refresh your browser and you should see only your ingredients list in red. Now you understand the real power of CSS, with this you can do practically anything.
Colors #
Something you will notice in the long run is that red, blue, yellow don’t always means the same thing in Google Chrome, Safari, Firefox or Internet Explorer. Most website do not use words to define colors but instead use codes, this guarantees the color looks the same no matter what browser or device your visitor is using. You will also probably feel that using words might a little limiting…
So how about this, go to Adobe Kuler, which is a cool and simple tools for browsing colors. Using this tool, you can find colors that match one another and obtain the code that represents it. Color codes can be represented as RGB or Hex for web pages.
If you take an RGB code, you should write something like this:
color: rgb(123, 233, 0);
If you are using a Hex code, write it this way (don’t forget the sharp symbol):
color: #AAF0A1;
There will be no difference in the color whether you use one or the other, this is up to your preference.
Fonts #
When it comes to fonts, you will be very limited. The reason for that is that you need to choose a font that others will have installed on their computer or device. If they don’t have it, then their browser will display the default font, which usually is Times New Roman (and it’s probably not what you want). The unfortunate thing is that only a handful of fonts are installed on every system and they are: Arial, Verdana, Courier and Times. There are ways to have custom fonts and still make them work, but it’s very complex. I suggest you look it up online and you will be able to find out more about using custom fonts for your website.
Events #
It is possible to define a different style based on an event. For example, if the user moves their mouse over an element, that element could change. Usually we use this effect for links to show they can be clicked, but you can actually apply this to any element. Here’s an example:
a{
    color: blue;
    text-decoration: none;
}

a:hover{
    text-decoration: underline;
}
This will cause your links to be underlined only when the visitor hovers their mouse over them. Like I said, you can use this for any element:
li:hover{
    font-weight: bold;
}
There are other events you can capture: :active, :visited, :focus…
CSS Reference #
There’s a lot of CSS parameters you can use. I won’t go over them all but I’ll give you a few that may be useful:
heightexample:height: 20px;widthexample:width: 33px;marginexample:margin: 5px;paddingexample:padding: 6px;margin-rightexample:margin-right: 11px;padding-bottomexample:padding-bottom: 2px;borderexamples:border: 1px solid red;,border: 3px dashed blue;border-topexample:border-top: 5px dotted green;font-sizeexample:font-size: 11px;font-styleexample:font-style: italic;text-decorationexample:text-decoration: underline;font-weightexamples:font-weight: bold;,font-weight: normal;,font-weight: light;text-alignexamples:text-align: left;,text-align: center;,text-align: right;font-familyexamples:font-family: Arial;,font-family: Verdana;colorexamples:color: red;,color: #00A1F2;,color: rgb(100,255,10);backgroundexamples:background: blue;,background: #000;
Doing It Right #
Finally there’s a few things that are usually never taught in a beginner’s tutorial. The reason for that is because it’s painful to explain and you may be confused (especially if it’s poorly explained). The issue is that as you get better you will become more confident, build more web pages and some day find out you’ve been doing it wrong all along because your tutorials didn’t explain how to do it right.
Doctype #
At the very top of every page’s source code, you need to specify the “doctype”. This tells the browser what version of HTML you’re using and therefore what kind of rules should be applied. I didn’t get into this because it’s not that important right now, but as you learn more HTML it will matter. Some HTML works a certain way in a certain version, and a different way in another version and you’ll get to learn that. For your web page to be correct, you need to specify the version even if you don’t care. Put this line at the very top of every .html file:
<!DOCTYPE html PUBLIC "-//W3C//DTD XHTML 1.0 Transitional//EN" "http://www.w3.org/TR/xhtml1/DTD/xhtml1-transitional.dtd">
HTML and HEAD Profiles #
Your <html> and <head> tags should also specify how they work, and what set of rules they’re using. Document types, HTML, CSS and more are defined by a board called the World Wide Web Consortium, also known as the W3C. Unfortunately all browsers do not implement the standard defined by these people entirely. These guys also improve their standards and change them every now and then. That’s why it’s so important to tell the browser what you’re using. Modify every .html file you have so that the <html> and <head> tags look like this:
<html xmlns="http://www.w3.org/1999/xhtml">
<head profile="http://www.w3.org/2005/10/profile">
UTF-8 Support #
At some point you may add some foreign characters to your pages. It can be French accents or Chinese characters. Unfortunately they won’t display right. That’s because by default, most web browsers will use a type of encoding that doesn’t support these characters. In order to fix it, you can specify in your page what type of encoding you want the browser to use. UTF-8 is a type of encoding that contains a lot of foreign characters including French accents, Greek, Chinese, Arabic, Japanese and more. Open every .html page you have and add the following into your header:
<meta http-equiv="Content-Type" content="text/html; charset=utf-8" />
Caching #
Your web browser is smart. When you visit a website, it will save all linked files (CSS, images, etc.) into a cache. This way, next time you visit it won’t have to download them from the web again, they’ll be right there and the page will display quicker. This means that if you change your main.css file, then people who have been on your site in the past will not necessarily see your new changes! You can fix this by renaming your CSS file when you change it. This way the browser will know this is a new file that needs to be downloaded again.
Here’s an example of how you can do this. In your header, you should have:
<link rel="stylesheet" type="text/css" href="css/main.css" />
I’m not going to rename the file because that’s annoying, I like to have main.css. So I’ll simply append something to the link:
<link rel="stylesheet" type="text/css" href="css/main.css?v1" />
What did I just do? I’m doing something called a GET request. We are very far from that and you won’t be learning what requests are before a while. What you need to know is that anything that comes after the question mark can be any text you want (A to Z, a to z, numbers, dashes and underscores only, no spaces!). What’s important is that this text be unique. I encourage you to use a version number so that you can just increment that number every time you make a change and don’t get confused. Next time you change and save your main.css file, you’ll change your header to:
<link rel="stylesheet" type="text/css" href="css/main.css?v2" />